Independence/Legends
- "I had never seen anything like it. The Mon Calamari vessel was huge. Our tiny shuttle floated next to it like a bitz bug next to a bantha."
- ―Keyan Farlander
The Independence was a MC80 Home One type Star Cruiser that, under the command of Admiral Gial Ackbar, acted as the Rebel Alliance Fleet's flagship in the early years of the Galactic Civil War. Originally constructed as an exploration ship, the Independence joined the Alliance to Restore the Republic after the Galactic Empire subjugated the Mon Calamari homeworld. It acted as a staging ground for several hit and fade attacks against the Galactic Empire and saw action several times against Imperial forces, including the Alliance victory at the Battle of Turkana. During this time it also oversaw the training of several promising Alliance recruits.
The Independence was replaced as Ackbar's flagship by Home One following the evacuation of Hoth in 3 ABY, but continued to serve an important role and acted as communications control ship for the Alliance Fleet at the Battle of Endor. Six months later it participated in the Battle of Brentaal IV. Almost twenty years later, it would again see action, fighting the Yuuzhan Vong for the New Republic.
Description
Design and armament
- "A crosshatch of structural beams arched overhead, layer on layer of flattened ribbon-like constructions that formed the outer shell of the Independence. I had never seen anything built like this and had no idea even what the building material was. Nothing was square or at right angles. It was a little disorienting."
- ―Keyan Farlander

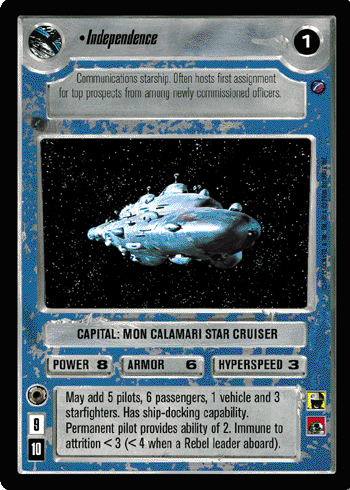
The Independence was a Mon Calamari Shipyards MC80 Star Cruiser of the Home One type. Costing 150,000,000 credits,[1] the Independence, like other Mon Calamari Star Cruisers, was unique. Its handcrafted outer shell was formed of layers of flattened ribbon-like structural beams, with no right-angles to be found. The elongated hemispheres on the hull took on an organic appearance from a distance. The Independence saw its share of combat and this took a toll on the vessel, leaving streaks of blackened scorch marks on the hull.[8]
A series of airlocks and hangars were located around the ship,[8] allowing it to serve as a starfighter carrier. The main hangars, located one on each side of the ship, could each support up to two starfighter squadrons. Bays located beneath the main hangars could store another three squadrons and turbolifts allowed up to three starfighters to be moved between each pair of main and lower bays simultaneously. A small auxiliary hangar bay,[1] located near the engine housings towards the rear of the ship,[8] handled the majority of the ship's day-to-day shuttle traffic. The auxiliary hangar also doubled as a repair bay.[1]
Originally constructed as an exploration vessel, the Independence was fitted with specialized sensors and communications equipment[1] which later allowed it to function as a communications control ship.[4] The Mon Calamari Star Cruisers' military-grade deflector shields and ability to carry starfighter squadrons saw them become the Mon Calamari's main defensive force.[9] The Independence was armed with 36 twin heavy turbolaser batteries and 36 twin battleship ion cannon batteries, each positioned six forward, twelve port, twelve starboard and six aft. In addition it was fitted with six heavy tractor beam projectors. The cruiser had capacity for up to 120 starfighters, along with numerous shuttles, landing craft and utility vehicles. It could also carry sufficient supplies for two years and was fitted with a Class 1 hyperdrive and a backup hyperdrive rated at Class 9.[1]
Operational facilities
- "The Independence was almost like a small city, with various zones and support services roughly located in four quadrants of the ship."
- ―Keyan Farlander
The ship was split into four quadrants, each containing various zones and support services—the bow quadrant, for example, was where most planning and navigation operations took place.[8] Although primarily used as a warship, the Independence had a variety of facilities to assist with the administration of the Rebellion. Alliance Chief of State Mon Mothma had an office on board and there were several lecture halls located on the ship.[2] There was also a large awards auditorium that was at least two stories high that presented Rebel personnel with various medals for distinguished actions in the service of the Rebel Alliance.[3] The ship contained an intelligence center, located near the communications center, for use by Alliance Intelligence. The intelligence center was home to numerous datacores and computers and was secured by two sets of heavy doors, which were guarded at all times. Entry required both a code cylinder and passcode. From here, intelligence reports were compiled and used to produce briefings for High Command or mission planning officers. The proximity to the communications center facilitated contact with Alliance Intelligence agents throughout the Empire.[1]

The Organization for Droid and Machine Abuse was based aboard the Independence, operating out of Department 1007 on Civil Deck 10.[10] The Independence also had a Med Deck where doctors and medical droids would treat any injuries sustained by the crew, often with the use of one of the ship's bacta tanks. Some of the ship's medical droids, such as M4, were capable of conducting psychological evaluations to assess if crew members were fit for duty.[8]
The ship's starfighter pilots, choosing to be as close to their ships as possible, made use of a section of the ship aft of amidships. The facilities in this section included a simulation room[8] where flight recordings from starships and astromech droids were used to recreate historical missions for training purposes. The simulator room contained four banks of twelve flight simulators which could each run separate missions or be linked to allow multiple squadrons to train together. Additional simulators were located in the starfighter repair bay. Each simulator could be configured to resemble the cockpit of standard starfighters and shuttlecraft. Scheduled training periods were usually booked via a signup board, but the simulator facilities were available to all operational pilots and flight cadets at any time.[1] The pilots also had access to a holo film room where they could review flight recorder footage from previous missions.[3][8]
The Independence had several rooms used for briefing and debriefing before and after missions. Briefings for large operations and missions involving multiple branches of the Alliance Military were generally conducted in the tactical theater, a sizable room with tiered seating around a sunken pit housing a large holoprojector. Alliance Special Operations tended to conduct briefings in one of the secure briefing rooms on the command deck, but also made use of the pilots' ready rooms on occasions. The pilots had two ready rooms located near each of the main hangars. The ready rooms were equipped with a holoprojector, a podium and seating for dozens of pilots.[1]
Accommodations and recreational facilities
The pilots spent so much time in their ready rooms that they converted at least one into a lounge, fitting it with holo decks, tables and food dispensers. When the pilots wanted something more elaborate than the snacks provided by the machines, they were able to get food sent over by the kitchen staff rather than going to the mess hall. A makeshift bar had been set up in the corner of the lounge which the senior officers overlooked. In addition to the mess halls used by the crew, there was also an executive dining room for senior personnel, which had the appearance of something planet-side with fabric-covered tables and fine crockery. The food, too, was above the level enjoyed by most of the crew, with meals prepared individually rather than in large vats.[8]
Long well-lit corridors ran throughout the ship, with main corridors wide enough to accommodate five people, lined by iris-like doors and sometimes intersected by smaller, tributary hallways. Hallways, like the design of the hull were not straight but curved left and right along their length.[8] The interior was originally filled with seawater, but it was later drained to accommodate terrestrial species.[1]
Several large concourses around the ship were devoted to supporting the crew. The aft quadrant contained Lucky Lower 13, originally a ballroom which, by the Galactic Civil War, served as a meeting place for many of the crew in the nearby engineering and administrative departments. One of the lower decks contained the Quarren section which had lower lighting levels than the upper decks, suiting the Quarren inhabitants who were used to the dark depths of the Mon Calamari seas. Crew quarters were often simple—small rooms with a desk, chair, a multi-species toilet, and a cot which came out of the wall at the touch of a button.[8]
History
Early service
Constructed by Mon Calamari Shipyards prior to the fall of the Galactic Republic,[1] the Independence was one of many Mon Calamari Star Cruisers originally built by the Mon Calamari as both exploration vessels and to defend their homeworld, Mon Cala.[9] For the majority of the Clone Wars between the Republic and the Confederacy of Independent Systems, the Independence was away from Mon Cala on a deep-space mission exploring worlds at the edge of the galaxy. The crew returned home in the final months of the war to find it had devastated their planet and claimed the lives of many of those they left behind.[1]
When the Clone Wars ended in 19 BBY with the Confederacy's defeat, Supreme Chancellor Palpatine declared himself Emperor and reorganized the Republic into the Galactic Empire.[11][12] Having just undergone a refit of its communications suite, the Independence was still docked in the shipyards above Mon Cala when Imperial forces launched an invasion. Carrying only a skeleton crew, the Independence, along with the cruisers Defiance and Liberty, was able to evade the Imperial blockade and escape to hyperspace.[1] However, the system was subjugated[9] and the Mon Calamari people were enslaved.[8]
Hiding deep within the Calamari sector, the cruisers evaded detection for years, focusing on their own survival but taking the opportunity to harry Imperial forces where possible. They eventually joined the fledgling Alliance to Restore the Republic and assisted in the liberation of Mon Cala.[1] The Mon Calamari Council initially chose not to join the Rebellion,[9] but the Independence remained with the Alliance and was placed under the command of the Mon Calamari Commander Gial Ackbar after his promotion to admiral. With its interiors drained of water and converted for use by terrestrial species, the ship became flagship of the Alliance Fleet.[1] During the early days of the Galactic Civil War, the Independence served as a starfighter depot and mobile command ship[9] and was home to Alliance Chief of State Mon Mothma and Alliance High Command.[1]
Expanding the Alliance
- "Red Squadron was piloting twelve of those X-wings, stationed aboard Ackbar's ship Independence. I noticed three kills before I had to eject."
- ―Wedge Antilles, on the Battle of Turkana

The Independence was among the first ships in the Alliance Fleet to carry the T-65 X-wing starfighter. One of the first uses of the new starfighter came at the Battle of Turkana[3] in 1 BBY.[14] The Independence was part of a Rebel fleet comprised of seven Mon Calamari Star Cruisers, two Nebulon-B frigates, two CR90 corvettes and four GR-75 medium transports which were undergoing refueling[13] in orbit of the planet Turkana[3] when they came under attack from an Imperial task force. The Imperial force, comprised of ten Star Destroyers led by Captain Xamuel Lennox aboard the Imperial-class Star Destroyer Tyrant, opened fire on the Rebel ships and dispatched their TIE squadrons,[13] but Ackbar responded quickly by launching the new starfighters, catching the Imperial forces by surprise.[3] The X-wings eliminated the Imperial fighters and joined Rebel BTL Y-wing starfighters in launching proton torpedoes at the Imperial capital ships, severely damaging two and forcing Lennox to order a retreat.[13]
Around this time, the Rebel Alliance was attempting to draw more support to its cause. The Independence played a major role in this initiative by carrying Mon Mothma to meet with resistance movements on planets throughout the Galactic Empire in an attempt to persuade them to join the Alliance. Security on these diplomatic missions was tight. On one such trip to Agamar in the Lahara sector, while Mon Mothma delivered her "A Call to Reason" speech to members of the resistance on the planet, the Independence remained in orbit, deploying four X-wings and four Y-wings, and keeping watch for signs of Imperial activity. Mon Mothma's visit paid off quickly—the Independence had arrived with a skeleton crew of 1,230 and, despite leaving some advisers behind to assist local efforts, left orbit with 1,233 on board, having acquired several new recruits.[2]
During this time the vessel also played host to meetings between senior Alliance personnel, including Mon Mothma, Admiral Ackbar, General Jan Dodonna and General Crix Madine. One such meeting occurred in orbit over Mon Cala upon the ship's return from Agamar.[2]
Operation Strike Fear
During this phase of the Alliance, the fleet participated exclusively in hit and fade attacks, for which Independence acted as a staging ground. The Independence launched several operations against the Empire in an attempt to slow down Operation Strike Fear. Its pilots assisted in the evacuation of Brigia and oversaw the protection of diplomatic negotiations between the Alliance and the Sullustans. When a shortage of astromech droids threatened the Alliance's starfighter operations, the Independence launched an operation to steal some R2 units from the Empire.[3]
The Independence later launched missions to capture an experimental warhead and an Imperial shuttle which was later used to deliver the warhead to the Imperial-class Star Destroyer Invincible. The destruction of the Invincible was instrumental in ending Operation Strike Fear.[3]
With the end of Operation Strike Fear, the crew of the Independence were confident about their chances against the Empire. However, news soon reached them that the Empire was developing a new weapon, which posed an even greater threat to the Rebellion. The Alliance launched a campaign to discover the nature of this threat.[8]
Operation Skyhook

Over a series of operations the Alliance was gradually able to discover more about the Imperial weapon. The Independence played a major role in this by launching a mission to capture some Imperial communications satellites which were later deployed near outpost AX-235 in the Cron Drift. The satellites eventually intercepted schematics for the new Imperial weapon, the Death Star.[3]
Due to the importance of the information, the Alliance dispatched Biggs Darklighter in an X-wing to retrieve it. However, after leaving AX-235, Darklighter's X-wing broke down and he came under attack by Imperial forces. The Independence sent three R-22 Spearheads to protect him until a rescue team could arrive and repair his ship. After escaping the attack he delivered the plans to the Independence.[8]
The plans were later delivered to Princess Leia Organa on her CR90 corvette, the Tantive IV. From here Leia was due to transfer to the Mon Calamari Star Cruiser Liberty but an Imperial attack prevented the transfer and the Independence had to send starfighters to assist in Leia's escape.[3] However, shortly after, she was finally captured by the Empire near Tatooine.[15]
At around the same time the Independence launched the Alliance's first direct starfighter assault on an Imperial capital ship. After the Imperial-class Star Destroyer Intrepid became stranded the Independence launched missions to destroy a convoy delivering a replacement hyperdrive and to eliminate its escort. In-keeping with the Alliance's hit and fade strategy the final assault to destroy the Intrepid was conducted by the Independence's starfighters without the cruiser's intervention.[3]
With the loss of the Death Star plans the Alliance focused its efforts on delaying the completion of the battlestation by attacking Imperial infrastructure and learning all they could about it by capturing senior Imperial officers and members of the design team. The Independence oversaw a plan devised by General Dodonna, launching starfighters to destroy the Imperial supply base near Kalla VII. The Battle of Kalla VII was a big success for the Alliance, resulting in the Imperial Nebulon-B escort frigate Priam becoming stranded in the system and subsequently being captured.[3]

After the completion of the first Death Star the Independence was carrying members of the Alliance High Command,[3] including Mon Mothma,[8] to the Rebel base on Yavin 4 to coordinate that Alliance's defense against the major Imperial offensive that was expected to begin. While in the Bestine system it came under attack from the Imperial-class Star Destroyer Immortal. All available fighters were scrambled to defend the ship.[3]
The Imperial attack consisted of TIE Bombers to attack the cruiser while Assault Gunboats and TIE Interceptors engaged the defending X-wings and R-22s. Despite splitting up and attacking from three different directions two of the Imperial bomber groups were quickly destroyed. The third made it through and began firing proton torpedoes at the Independence. The defending starfighters were caught up fighting the Gunboats but eventually broke away and were able to help the Independence's gunners destroy the last bombers. The Independence escaped to hyperspace with its shields down but with only minimal hull damage. However two R-22 Spearheads were lost in the battle.[8]
By the time the Independence arrived at Yavin during the night shift work had already begun to repair the damage, which was mostly confined to the shield coils and some electronics.[8] After escaping from Imperial custody Leia had arrived with the Death Star plans which indicated that their best hope of defeating it lay in their starfighters, rather than their larger ships. However the Death Star was in pursuit.[15] To assist in the forthcoming battle the Independence's pilots and starfighters were transferred to the Rebel base. Several would participate in the Battle of Yavin, as the Rebels won a major victory by destroying the Death Star.[8]
Imperial pursuit

After the destruction of the Death Star the Alliance began to move away from its previous reliance on starfighters to a fleet-first strategy developed by Ackbar.[9] The Independence continued to serve as the Alliance's flagship and its pilots were involved in several more missions including covering the withdrawal from Yavin as well as the evacuation of the cruiser Maximus and the frigate Anvil when they were attacked by Imperial forces during the retreat.[3] Shortly thereafter, a memorial service for Jan Dodonna was held aboard the Independence to honor the general's apparent death during the evacuation.[16] Other missions launched from the Independence led to the destruction of the Imperial frigate Red Wind and the capture of an Imperial corvette, later renamed the Ram's Head and used to ram an array of Star Destroyers in a shipyard.[3]
The Mon Calamari eventually approached Ackbar to help rebuild their fleet. Ackbar resigned his position with the Rebel Alliance and left the Independence to return to his homeworld. During his absence, Ackbar worked to secure his people's full support for the Rebellion and continued to oversee Project Shantipole, the secret development of the Slayn & Korpil B-wing starfighter.[9] The Independence was one of several ships in the Alliance fleet to take delivery of the new fighters, which went on to be used in several missions, including the destruction of the Imperial-class Star Destroyer Relentless.[3] After the Mon Calamari became full members of the Alliance, Ackbar returned his flag to the Independence and took the position of Supreme Commander of the Alliance Military.[9]
When the Alliance was attempting to persuade the Habassa to join the Rebellion the Independence launched missions to rescue Habassan prisoners from the Empire and to help a Habassan convoy under Imperial attack. The operations succeeded in persuading the Habassa to join the Rebellion and the Independence was chosen as the location for the formal declaration of their support. Security for the arrival of the Habassan envoy was kept tight with three R-22s from Red Squadron requested by the Habassa to provide protection.[3]
Shortly after the R-22s rendezvoused with the Habassan transport Bardictol the Imperial frigates Havok and Riptide came out of hyperspace and flanked the Independence. Two CR90 corvettes from Birkby came to assist in the fight against the frigates and the R-22s were able to hold off the Imperial TIEs and Assault Gunboats until the Bardictol reached the Independence and the cruiser safely escaped into hyperspace.[8]
In 2 ABY, the Alliance was in the process of establishing a new secret base on the remote ice world of Hoth. With the Rebels in urgent need of raw materials to complete the base, the smuggler Han Solo arranged a meeting with a merchant consortium on the commercial space platform Arnot Station. Solo accompanied the mission team, led by Princess Leia Organa and General Vanden Willard, when it set out from the Independence aboard the freighter Gamble. Among the Gamble's crew was Kifar Itran, an Imperial deep-cover agent who had recently transferred to the Independence from a Rebel transport group. Itran revealed the Gamble's route to the Empire and the freighter was intercepted by an Imperial light corvette under Commander Degoren as it traveled to Arnot Station. When news of the Imperial attack reached General Madine aboard the Independence, he dispatched Rebel pilot Luke Skywalker and Solo's co-pilot, the Wookiee Chewbacca, aboard Solo's Millennium Falcon to assist. With the assistance of the Millennium Falcon and the crew of the Alderaanian gunship Aegis, the Gamble's crew escaped pursuit by both Imperial and pirate forces and returned to the Independence.[17]
After Hoth

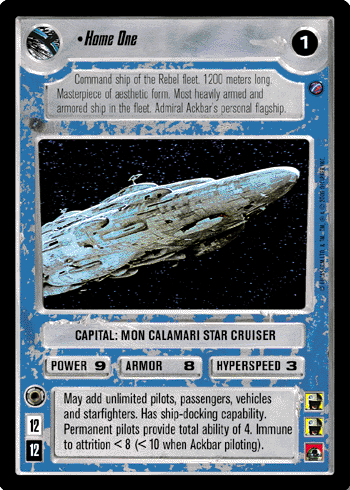
The Rebels were forced to abandon their base on Hoth when it was attacked by Imperial forces in 3 ABY.[12][18] After this, the flag was transferred to the Mon Calamari Star Cruiser Home One,[1] which served as Ackbar's command ship and the Alliance's traveling headquarters.[19] The Independence, however, continued to be an important part of the fleet.[5]
When the Empire began working on a second Death Star the Alliance was able to capture an Imperial computer containing data on the project which was taken to the Bothan colony on Kothlis to be decrypted. When they were later forced to evacuate, the corvette Razor was scheduled to rendezvous with the Independence to transfer the computer. Due to the importance of the computer's data, Admiral Ackbar was on board the Independence to see it to its final destination. Following the capture and destruction of the Razor, the computer found its way onto the Dreadnaught-class heavy cruiser Mercury which took it to the rendezvous point.[5]
The transfer was interrupted by the arrival of the Executor-class Star Dreadnought Executor which quickly began firing on both ships and launched TIE Bombers to assist in their destruction. A group of X-wings sent from the Liberty quickly moved to intercept and were soon joined by RZ-1 A-wing interceptors launched by the Independence. The Rebel fighters were able to hold off the TIEs until the transfer was complete and both the Independence and the Mercury escaped to hyperspace.[5]
Around the same time, the Nami pirate Ali Tarrak was able to acquire a prototype TIE/D Defender and, after the Nami began manufacturing the starfighters, she entered negotiations to supply them to the Rebel Alliance. With the negotiations complete, the Independence, accompanied by the Strike-class medium cruisers Lonsigar 1 and Lonsigar 2, traveled to Tarrak's Deep Space Manufacturing Facility. However, they came out of hyperspace to find the facility under attack from the Star Destroyer Grey Wolf, commanded by Admiral Thrawn. A Missile Boat flown by Maarek Stele attacked the Independence, though it managed to escape.[7] At some point the vessel also survived an attack by the Star Destroyer Merciless.[20]
Mustering the fleet
- "Gold Group reporting in, Admiral. Sorry we're a little late."
"We've been expecting you, Gold Group." - ―Olin Garn and Gial Ackbar after Gold Group arrive to assist the Independence

With the threat of the second Death Star revealed, the Alliance began to assemble their fleet near Sullust in preparation for a major attack on the battlestation. The Independence, again under the command of Admiral Ackbar, headed towards the rendezvous leading a group comprising the CR90 corvette Saki, the EF76 Nebulon-B escort frigate Redemption, the Corellian gunship Chandi and the bulk cruiser Urjani. With the Empire searching for the location of the Rebel fleet, the threat of an attack was high and the Independence's group encountered a number of Imperial patrols on the way.[5]
For the final leg of the journey the Independence was to rendezvous with an A-wing group from the Liberty, led by Olin Garn, which would escort it the rest of the way. However, the escort was delayed after assisting the Defiance's group make its final jump to hyperspace and, by the time they arrived, the Independence's group had come under attack from the Star Destroyers Immortal, Protector and Vanguard.[5]
While the A-wings moved to clear the area of the enemy TIEs, particularly the TIE Bombers which were launching torpedoes towards the Independence, Ackbar ordered B-wings to launch and counterattack the Star Destroyers. The Rebel fighters were able to hold the Imperials back long enough for the Independence to escape to hyperspace, after first ensuring that the rest of the group was safely away.[5]
Battle of Endor
With the Independence and the Defiance having safely arrived at the rallying point the Alliance was ready to begin its attack on the Death Star.[5] The stolen computer revealed that the Death Star was being constructed in orbit of Endor. Furthermore, the Emperor himself was overseeing the final stages of construction. While incomplete it would be possible for a small ship to fly inside the superstructure and destroy the station's reactor. Although this ruled the Independence out, it, along with the rest of the fleet, would move to engage any defending Imperial ships.[21] Ackbar would command from Home One while the Independence acted as the Alliance's fleet communications control center.[4][21]
When the fleet emerged from hyperspace they discovered a large Imperial fleet waiting for their arrival. Furthermore, the Death Star's primary weapon was fully operational. The fleet was forced to confront the Imperial Star Destroyers at close range to avoid the Death Star's firepower but the Independence was able to survive the fighting until the Death Star eventually succumbed to the Rebel attack.[21] Following the battle, the Independence took on some of the surviving pilots from the Liberty, which had been destroyed by the Death Star, including Ace Azzameen.[5]
Service to the New Republic

- "Rogues, back to the Independence. Now!"
- ―Rogue Squadron are ordered to break off their attack on Vuultin
During the months that followed the Battle of Endor the Alliance evolved into the New Republic and looked to continue their momentum by scouting out Imperial locations in search of suitable targets. After Rogue Squadron scouted Brentaal IV in the Bormea sector, the new Imperial leader Sate Pestage vowed to defend the world at all costs forcing the Alliance to move quickly against the world. Consequently, six months after Endor, the Independence saw action again as it participated in the Battle of Brentaal IV.[6]
After arriving at Brentaal IV, Admiral Ackbar, commanding the Republic forces[6] from aboard the Independence,[9] ordered Rogue Squadron and Aggressor Wing to attack the starfighter defenses resulting in the quick capture of the planet's moon.[6] However, the arrival of Baron Soontir Fel's 181st Imperial Fighter Group reinforced the Imperial defenses. When fighting resumed the 181st inflicted heavy losses and Rogue Squadron were ordered to break off their attack on Vuultin and return to the Independence. However, their feint had succeeded in causing Admiral Isoto to withdraw Fel's forces from Oradin which subsequently fell to the Republic.[22] With their forces on the ground the Republic forces soon secured the planet and the capture of Fel.[23]
Little is known of the Independence's actions during the early years of the New Republic as the New Republic Defense Fleet looked to modernize its forces. However, the ship would see action during the Yuuzhan Vong War. As part of the New Republic's response to the Yuuzhan Vong invasion, the Independence was assigned as flagship of a small task force charged with locating and destroying stray Yuuzhan Vong patrols. To assist in this mission the Independence was assigned two squadrons of X-wings. During the course of its patrol the Independence's task force engaged a small Yuuzhan Vong force, consisting of a Yorik-vec assault cruiser and three squadrons of coralskippers, near Mon Cala.[24]
Commanders and crew
When fully staffed the Independence's crew numbered 5,400 officers, pilots and enlisted crew. During the early Galactic Civil War, the ship operated with a skeleton crew of 1,230 on multiple occasions, including its escape from the Imperial invasion of Mon Cala[1] and a later recruiting mission to Agamar.[2] The ship had capacity for up to 1,200 passengers or troops. During the Clone Wars, the ship was crewed by natives of the ocean world Mon Cala. Both the Mon Calamari and Quarren were aquatic species and the Independence was originally filled with water. After joining the Rebel Alliance, the ship was drained to support[1] a crew drawn from several species from across the galaxy. Joining the many Mon Calamari and Quarren on board were representatives of a number of species including Humans and Sullustans. The crew worked in shifts, with time synchronized with the light and dark cycles of the ship's most recent planetary call. Despite these concessions, areas inhabited primarily by Quarren crew maintained low lighting to simulate the deep waters of their homeworld. The crew was divided into several departments including Operations, Communications, Logistics, Sector Command and Intelligence, with each responsible for just part of the ship's operation.[8] The Independence was often used as a first assignment for top prospects among newly recruited officers.[4]
Alliance High Command

As the flagship of the Alliance fleet prior to the Battle of Hoth, the Independence served as home to Alliance High Command, including Chief of State Mon Mothma,[1] General Crix Madine[17] of Rebel Alliance Special Forces,[16] General Jan Dodonna of Starfighter Command[8] and General Airen Cracken of Alliance Intelligence.[1] The High Command members' staff were also based aboard the ship, including Mon Mothma's aide Lynia Delline[8] and protocol droid D6-L5,[2] and Lieutenant Commander Lagrane, one of General Dodonna's staff officers.[8] During the early Galactic Civil War, the Independence was under the command of Admiral Gial Ackbar, commander of the Alliance's Fleet Command[5] and later Supreme Commander of the Alliance Military.[9] Among those serving under Ackbar was the ship's Sullustan navigator, Lieutenant Commander Chiithii'n.[8]
Starfighter Command
Starfighter Command maintained a large presence on board and General Dodonna was frequently on the Independence.[8] The ship's complement of 120 starfighters[1] were manned by pilots from several squadrons, including Red Squadron, Blue Squadron and Gold Squadron prior to the Battle of Yavin.[8] Rogue Squadron were also based aboard the Independence for periods in 2 ABY[17] and again in 4 ABY.[6][12] Senior pilots stationed aboard the ship included Commanders Hamo Blastwell and Keyan Farlander of Red Squadron and Captain Ernek Marskan of Blue Squadron. In addition to the pilots themselves, the Independence was home to a number of support staff including the technicians who maintained and repaired the starfighters and the astromech droids that helped to operate them. Senior pilots frequently participated in mission planning, but Starfighter Command also had dedicated mission planning officers aboard the Independence, among them Commander S'man, while Lieutenant Commander Lagrane also served as debriefing officer. Starfighter Command also had some civilian staff on board, among them the retired pilot Halley Kadorto.[8]
The Independence served as a training ground for Alliance starfighter pilots. The senior officer in charge of overseeing their training around the time of the Battle of Yavin was Commander Wex "TIE-Die" Dafid, but veteran pilots also served as liaison officers to rookies to help with their orientation. The high attrition rate among rookie pilots led to the senior pilots adopting the slang term "likely to survive" to describe promising cadets. Among the new recruits trained on the Independence were; from Agamar, Keyan Farlander, Sunnar Jan-lo, 'Ndranth Poussan and Breth Gart, from Bestine IV; Namrhe,[8] and from Devaron; Grizz Frix.[25]
Additional personnel
Several staff were based aboard the Independence to oversee recruitment efforts, including Captain Beme.[2] General Cracken operated a major intelligence center on board the Independence which was staffed by numerous intelligence officers and droids.[1] Alliance Intelligence also conducted training aboard the Independence; Sunnar Jan-lo was one such trainee and underwent intelligence training while serving as an active pilot before ultimately switching roles.[8] The ship also carried Alliance Special Operations[1] and Alliance Special Forces personnel, among them the commandos of Storm Unit.[8] Alliance Ordnance and Supply also maintained a presence on board, frequently supplying the deck officers who stood watch over the auxiliary docking bay.[1] The ship had a number of clerks and petty officers who were responsible for controlling outside communications.[8]
The Independence's Med Deck was crewed by a mix of sentient doctors and orderlies, and medical droids, including M4. Other members of the crew included the kitchen staff, a computer operations team[8] and Resinn, who led the prosecution of the Hurrim leader Golov Nakhym after his capture by Alliance forces.[5] The Organization for Droid and Machine Abuse was also based aboard the ship.[10]
Behind the scenes
Star Wars: X-Wing

The Independence was created for the 1993 LucasArts video game Star Wars: X-Wing and features prominently in both the accompanying novella The Farlander Papers and X-Wing: The Official Strategy Guide.[2][3][10]
In Star Wars: X-Wing, the Independence serves as the Rebel flagship. X-wing uses the main concourse on the Independence to allow the player to select which game mode they want, with each door representing a different option. When the player selects a campaign, they are shown transferring to the Defiance from which the missions launch.[3] However, the narrative sections of Rusel DeMaria's X-Wing: The Official Strategy Guide confirm that the player's character, Keyan Farlander, serves on the Independence and all but a handful of missions are launched from the ship.[8]
Issue 99 of Computer Gaming World, released in October 1992, featured a preview of Star Wars: X-Wing which described transitions between missions taking place on the Mon Calamari Star Cruiser Dreadnought and at a Calamari space port.[26] The Independence and the Defiance take the place of these in the finished game, with the Independence acting in the role of the space port.[3]
The Independence's involvement in the Battle of Turkana is shown in the opening cutscene to the original DOS version of Star Wars: X-Wing. The 1998 re-release of X-Wing for Windows 98 featured some changes to cutscenes, including a shorter version of the opening cutscene which no longer identifies the Independence by name, but still shows Admiral Ackbar commanding the battle from it.[3] The 2014 reference book Star Wars: Imperial Handbook: A Commander's Guide by Daniel Wallace confirmed that the Independence was under Ackbar's command during the battle.[13]
Inconsistencies
The Independence's entry in The Complete Star Wars Encyclopedia mentions an attack on the ship by the Star Destroyer Merciless which is not shown in any other source. This information had previously been included in the ship's entry in The Completely Unofficial Star Wars Encyclopedia by Bob Vitas, one of the contributing authors to The Complete Star Wars Encyclopedia.[20][27]
Due to a limitation in lengths of ship names, the Independence appears in the Star Wars: TIE Fighter: Defender of the Empire mission "Eliminate TIE Defender Factory" as the Independenc,[7] though TIE Fighter Collector's CD-ROM: The Official Strategy Guide uses the full name in its walkthrough of the mission. The destruction of the Independence is listed as a bonus goal for the mission. The mission's walkthrough in TIE Fighter Collector's CD-ROM: The Official Strategy Guide describes the Independence's destruction by Maarek Stele,[28] but this is inconsistent with its appearance in sources set after the events of TIE Fighter.[6][24][5]
Class and appearance

The Battle of Endor during Star Wars: Episode VI Return of the Jedi featured three different models of Mon Calamari Cruiser: the MC80 Home One type, the MC80 Liberty type and a wingless variant of the Liberty type later identified as the MC80a Star Cruiser.[29] The film also identifies the Rebel flagship by the name Home One.[21] The appearance of Independence in the cutscenes of Star Wars: X-Wing is based on the Home One type model and its position as Rebel flagship in the game led to some confusion among fans as to whether it and Home One were the same ship.[30][31] Both the Q&A section on StarWars.com and the "Ask the Master" article in Star Wars Insider 78 confirmed that the vessels were two different ships sharing the same design.[32][33] Other sources to confirm that the two are different ships include the Star Wars Customizable Card Game: Death Star II Limited set of the Star Wars Customizable Card Game, released in 2000,[4][34] and The Complete Star Wars Encyclopedia, which has separate entries for both ships. Both sources confirmed that the Independence served as the communications control ship during the Battle of Endor[20][35] and its participation in the battle was depicted in Star Wars: X-Wing Alliance.[5]
Star Wars: X-Wing only includes one variant of Mon Calamari Star Cruiser, which is identified in the game's Tech Room as the MC80a.[3] Star Wars: X-Wing Alliance features both the Home One type and Liberty type cruisers but also identifies the Home One type, to which the Independence belongs, as the MC80a.[5] The Independence is also identified as an MC80a in its entry in The Complete Star Wars Encyclopedia,[20] which also uses this designation for Home One.[35] The 2007 Saga Edition of Starships of the Galaxy formally established the Home One type and Liberty type as variants of the MC80 Star Cruiser[36] and 2012's The Essential Guide to Warfare clarified that the MC80a correctly applies to the wingless variant of the Liberty type seen in Return of the Jedi.[9][29] The 2015 roleplaying sourcebook Strongholds of Resistance explicitly identifies the Independence as Home One type.[1]
Images of the Home One model, which was originally designed for Return of the Jedi by Joe Johnston and Nilo Rodis-Jamero and built by Ease Owyeung, Ira Keeler, Bill Buttfield and Jeff Mann,[37] were used to represent Independence in The Farlander Papers,[2] X-Wing: The Official Strategy Guide[8] and Death Star II Limited.[4][33]
Appearances
- The Farlander Papers
- Star Wars: X-Wing (First appearance)
- Star Wars: TIE Fighter: Defender of the Empire
- Star Wars: X-Wing Alliance
- Razor's Edge
- Razor's Edge audiobook
- Star Wars: Episode VI Return of the Jedi (Retcon)
- X-Wing Rogue Squadron 21
- X-Wing Rogue Squadron 22
Sources
- X-Wing: The Official Strategy Guide
- X-Wing Collector's CD-ROM: The Official Strategy Guide
- TIE Fighter: Defender of the Empire: Official Secrets & Solutions
- TIE Fighter Collector's CD-ROM: The Official Strategy Guide
- Star Wars Encyclopedia
- The Essential Guide to Planets and Moons
- Star Wars: Behind the Magic
- Star Wars: X-Wing Alliance: Prima's Official Strategy Guide
- The New Essential Guide to Characters
 Star Wars Customizable Card Game – Death Star II Limited (Card: Independence) (backup link)
 "Silent Death"—Star Wars Gamer 7
 "Ask the Master" – Star Wars Insider 78
- The Complete Star Wars Encyclopedia
 Star Wars Questions & Answers on StarWars.com (content now obsolete; backup link)
 Frix, Grizz in the Databank (content now obsolete; backup link)
- The Essential Guide to Warfare
- The Essential Reader's Companion
- Star Wars: Imperial Handbook: A Commander's Guide
- Strongholds of Resistance
- File:StarWarsLCG Logo.png Star Wars: The Card Game – Evasive Maneuvers (Card: Independence) (Lua error in package.lua at line 80: module 'Module:ArchiveAccess/FFGTCG' not found.)
- File:Armada.png Star Wars: Armada – Home One Expansion Pack (Card: Independence)
Notes and references
- ↑ 1.00 1.01 1.02 1.03 1.04 1.05 1.06 1.07 1.08 1.09 1.10 1.11 1.12 1.13 1.14 1.15 1.16 1.17 1.18 1.19 1.20 1.21 1.22 1.23 1.24 1.25 1.26 1.27 1.28 1.29 1.30 1.31 1.32 1.33 1.34 1.35 1.36 1.37 1.38 1.39 1.40 1.41 Strongholds of Resistance
- ↑ 2.0 2.1 2.2 2.3 2.4 2.5 2.6 2.7 2.8 The Farlander Papers
- ↑ 3.00 3.01 3.02 3.03 3.04 3.05 3.06 3.07 3.08 3.09 3.10 3.11 3.12 3.13 3.14 3.15 3.16 3.17 3.18 3.19 3.20 3.21 3.22 3.23 3.24 3.25 3.26 3.27 Star Wars: X-Wing
- ↑ 4.0 4.1 4.2 4.3 4.4 4.5 4.6 Star Wars Customizable Card Game – Death Star II Limited (Card: Independence) (backup link)
- ↑ 5.00 5.01 5.02 5.03 5.04 5.05 5.06 5.07 5.08 5.09 5.10 5.11 5.12 5.13 5.14 5.15 5.16 5.17 5.18 5.19 5.20 Star Wars: X-Wing Alliance
- ↑ 6.0 6.1 6.2 6.3 6.4 6.5 6.6 X-Wing Rogue Squadron 21
- ↑ 7.0 7.1 7.2 Star Wars: TIE Fighter: Defender of the Empire
- ↑ 8.00 8.01 8.02 8.03 8.04 8.05 8.06 8.07 8.08 8.09 8.10 8.11 8.12 8.13 8.14 8.15 8.16 8.17 8.18 8.19 8.20 8.21 8.22 8.23 8.24 8.25 8.26 8.27 8.28 8.29 8.30 8.31 8.32 8.33 8.34 8.35 8.36 8.37 8.38 8.39 X-Wing Collector's CD-ROM: The Official Strategy Guide
- ↑ 9.00 9.01 9.02 9.03 9.04 9.05 9.06 9.07 9.08 9.09 9.10 The Essential Guide to Warfare
- ↑ 10.0 10.1 10.2 Star Wars: X-Wing Alliance: Prima's Official Strategy Guide
- ↑ Star Wars: Episode III Revenge of the Sith
- ↑ 12.0 12.1 12.2 The New Essential Chronology
- ↑ 13.0 13.1 13.2 13.3 13.4 Star Wars: Imperial Handbook: A Commander's Guide
- ↑ Star Wars: X-Wing begins after the X-wing starfighter entered service with the Alliance to Restore the Republic, which The Essential Guide to Warfare places in 1 BBY. X-Wing: The Official Strategy Guide establishes that the capture of Leia Organa occurs at the end of Star Wars: X-Wing's second tour of duty. Organa's capture takes place on 35:3:3 under the Great ReSynchronization dating system, placing it at the beginning of 0 BBY according to the following explanation. Events in Star Wars: X-Wing before the end of the second tour of duty therefore take place in 1 BBY.
- ↑ 15.0 15.1 Star Wars: Episode IV A New Hope
- ↑ 16.0 16.1 The New Essential Guide to Characters
- ↑ 17.0 17.1 17.2 Razor's Edge
- ↑ Star Wars: Episode V The Empire Strikes Back
- ↑ Mon Calamari Star Cruiser in the Databank (content now obsolete; backup link)
- ↑ 20.0 20.1 20.2 20.3 The Complete Star Wars Encyclopedia, Vol. II, p. 99 ("Independence")
- ↑ 21.0 21.1 21.2 21.3 Star Wars: Episode VI Return of the Jedi
- ↑ 22.0 22.1 X-Wing Rogue Squadron 22
- ↑ X-Wing Rogue Squadron 24
- ↑ 24.0 24.1 "Star Wars—Silent Death: The New Jedi Order"—Star Wars Gamer 7
- ↑ Frix, Grizz in the Databank (content now obsolete; backup link)
- ↑ Alan Emrich. "X-Wing Sneak Preview". Computer Gaming World 99. October 1992. "These transitions between scenes take place not on the Tiger's Claw, but on the Calamari Star Cruiser, Dreadnought and at a Calamari space port."
- ↑ Bob Vitas: Independence. The Completely Unofficial Star Wars Encyclopedia (archived from the original on October 18, 2007)
- ↑ TIE Fighter Collector's CD-ROM: The Official Strategy Guide
- ↑ 29.0 29.1
 Jason Fry's Dorkery — EG to Warfare: Endnotes Pt. 12 on Tumblr (backup link)
- ↑ Curtis Saxton: Warships of the Mon Calamari (2006-10-28). Star Wars Technical Commentaries (archived from the original on June 5, 2017)
- ↑
 Home One/Independence same ship? on the Jedi Council Forums (Literature board; accessed January 8, 2018) (backup link)
- ↑ Star Wars Questions & Answers on StarWars.com (content now obsolete; backup link)
- ↑ 33.0 33.1 "Ask the Master" – Star Wars Insider 78
- ↑ Star Wars Customizable Card Game – Death Star II Limited (Card: Home One) (backup link)
- ↑ 35.0 35.1 The Complete Star Wars Encyclopedia, Vol. II, p. 54 ("Home One")
- ↑ Starships of the Galaxy (Saga Edition)
- ↑
 1996 Topps Star Wars: Return of the Jedi Widevision (Card: Ext. Space—Rebel Fleet) (backup link not verified!)