Liberation of Stars' End
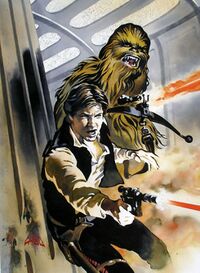
The Liberation of Stars' End, referred to as the Mytus VII disaster in Corporate Sector Authority correspondence, was the mission to liberate the political prisoners of Stars' End.
Prelude
- "Our mission is yours now; it's nearly certain the Wookiee will be put in with the rest of the Authority's special enemies."
- ―Rekkon to Han Solo
Han Solo and Atuarre both had close relations incarcerated in the Corporate Sector Authority prison facility at Stars' End, but had no plan for a rescue operation. After intercepting a transmission from the Imperial Entertainers' Guild to Viceprex Hirken, administrator of Stars' End, they crafted a plan to infiltrate the base. Along with Atuarre's son, Pakka, and the labor droid Bollux, they fabricated the guise of an entertainment troupe named Madame Atuarre's Roving Performers, to gain entrance to Stars' End.
The Mission
- "Oh, Solo-Captain, you madman!"
- ―Atuarre
After making planetfall on Mytus VII, the group met with Viceprex Hirken, who was not interested in other diversions, but was anxious to commence the duel between his Mark X Executioner droid and Bollux, in the guise of Annihilator. Using the pretense that Annihilator needed repairs on his auxiliary management circuitry, Han requested the use of a circuit scanner, to discover the nature of the damage.
Destroying the Power Plant
- "Max, are you telling me we blew Stars' End into orbit?"
"No, Captain. A high-arc trajectory, maybe, but never an orbit." - ―Han Solo and Blue Max
Once on the computer level, Han Solo and Blue Max started the search for the missing persons, while Atuarre and Pakka entertained the resident officials. Han and the probe droid did not find a detention level, but rather a tier block filled with many stasis booths drawing an enormous amount of energy from the base's power plant. Solo concocted a scheme to begin load-shedding the tower's secondary control systems, starting an overload spiral. Han was also able to damage the plant's primary control ancillaries, which caused the power plant to erupt. Because of the tower's construction of molecularly bonded armor and its defensive deflector shield, the tower was not destroyed in the explosion, but launched into a high-arc trajectory, far above the planet's surface.
The Rescue
- "If we ever get out of this, partner, let's settle down on a nice, quiet, stellar delivery route, what d'you say?"
- ―Han Solo to Chewbacca

During the confusion prior to the explosion, Atuarre and her cub had made their way back to the Millennium Falcon, while Han went off to aid the prisoners. After leaving the surface, the tower's power management routers focused power to life support systems, disregarding the tremendous amount of energy needed to maintain the stasis booths' entropy fields. Many of the prisoners were slowly emerging from their booths, just as Solo arrived, including Chewbacca, Doc, and Atuarre's mate, Keeheen. Meanwhile, the Security Police on the surface had dispatched a strike team in an Espo assault ship to the lower airlock of the tower, in effort to rescue the Viceprex. The prisoners now had to defend their mid-level position from below as well as above. Just as they were about to initiate an offensive to capture Hirken and use him as a hostage, Atuarre docked the Millennium Falcon at the tier block level airlock, with an attached tunnel-tube junction station in tow. They extended one of the tunnel-tubes down to the lightly-manned assault craft, and Chewbacca with a small strike force, was able to commandeer the vessel. Using both ships, and the attached tunnel-tube junction, Han, Chewbacca, Doc, and Atuarre were able to board the prisoners and cast-off from the descending tower.
Aftermath
- "Please take me, Solo! Do anything-anything-anything to me, but don't leave me here to—"
- ―Viceprex Mirkovig Hirken
Viceprex Hirken was shot in the back by one of his guards after betraying his officers, while pleading for safe passage on one of the vessels. Both ships, however, departed while the tower plummeted to its destruction, and made their way to the recently established outlaw tech base on Urdur.
Appearances
- Han Solo at Stars' End (First appearance)
- Han Solo at Stars' End comic strip
- Han Solo's Revenge (Mentioned only)
- Han Solo and the Lost Legacy (Indirect mention only)
Sources
- The Essential Chronology
- The Essential Guide to Weapons and Technology
- The Essential Guide to Planets and Moons
 "ComicScan: Coming Full Circle" – Star Wars Galaxy Collector 3
- The New Essential Chronology
 "Underworld: A Galaxy of Scum and Villainy" – Star Wars Insider 89 (Indirect mention only)
 Underworld Appendix: Swoops, Spice, and Wretched Rogues on Hyperspace (article) (content removed from StarWars.com; backup link)
 "Han Solo: The Early Years" – Star Wars Insider 106
- The Complete Star Wars Encyclopedia
- The Essential Atlas
- Galaxy at War
- Millennium Falcon Owner's Workshop Manual
- The Essential Reader's Companion
 So Uncivilized: Great Gunslingers in Star Wars, Part 1 on StarWars.com (article) (backup link not verified!)
 Galactic Gladiators: Great Warriors of Star Wars on StarWars.com (article) (backup link not verified!)
- Star Wars: Edge of the Empire Core Rulebook
- Star Wars: Age of Rebellion Core Rulebook (Indirect mention only)