Scenes cut from Star Wars: Difference between revisions
Jump to navigation
Jump to search
imported>TenCents |
No edit summary |
||
| Line 1: | Line 1: | ||
{{Top|real|title=Scenes cut from ''Star Wars''}} | {{Top|real|title=Scenes cut from ''Star Wars''}} | ||
This is a partial list of scenes (some filmed, some in animatic form or merely considered) that weren't included in any version of the [[canon]] films or TV series. Some scenes were cut due to time constraints, some didn't fit into the flow of the story, and others are simply alternative angles that have yet to be used. Most of the [[original trilogy]] deleted scenes weren't released until the 2011 [[Star Wars: The Complete Saga|Blu-ray release]]. | |||
This is a partial list of scenes (some filmed, some in animatic form or merely considered) that weren't included in any version of the [[canon]] films or TV series. Some scenes were cut due to time constraints, some didn't fit into the flow of the story, and others are simply alternative angles that have yet to be used. | |||
==[[Star Wars: Episode IV A New Hope|Episode IV - ''A New Hope'']]== | ==[[Star Wars: Episode IV A New Hope|Episode IV - ''A New Hope'']]== | ||
| Line 522: | Line 182: | ||
File:LadyPilot.jpg|The Human female pilot | File:LadyPilot.jpg|The Human female pilot | ||
</gallery> | </gallery> | ||
==Notes and references== | ==Notes and references== | ||
{{Reflist}} | {{Reflist}} | ||
[[Category:Films]] | [[Category:Films]] | ||
[[Category:Real-world lists]] | [[Category:Real-world lists]] | ||
Latest revision as of 02:48, 15 September 2022
This is a partial list of scenes (some filmed, some in animatic form or merely considered) that weren't included in any version of the canon films or TV series. Some scenes were cut due to time constraints, some didn't fit into the flow of the story, and others are simply alternative angles that have yet to be used. Most of the original trilogy deleted scenes weren't released until the 2011 Blu-ray release.
Episode IV - A New Hope
Completed scenes released on Blu-ray
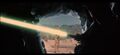
- Luke in the Desert/Tosche Station — Luke Skywalker is in the Tatooine desert repairing a moisture vaporator, assisted by a WED Treadwell repair droid, when he notices shining objects in the sky. Luke looks with his macrobinoculars at two ships engaged in combat beyond the atmosphere. He jumps into his landspeeder. The malfunctioning Treadwell blows a fuse and is unable to follow. Luke speeds off into the desert to find his friends. (This could have cut to the first film appearance of Darth Vader, although the scene is connected via circular wipe to the arrival at Tosche Station in the Blu-ray deleted scene. The next segment would follow R2-D2 and C-3PO ejecting from the Tantive IV in an escape pod.) Luke rushes into Tosche Station excitedly telling his friends about the battle above their planet. He is overjoyed to be reunited with his friend Biggs Darklighter who is on planet leave from the Academy. Camie, Fixer, and Biggs all follow Luke outside to see the battle with Luke's macrobinoculars. The battle appears to have ended and Luke's friends ridicule him for making it all up. (This scene was to come before Princess Leia being led captive before Darth Vader.) The footage has been degraded by poor film storage conditions, but was restored somewhat in the Blu-ray edition.[1]
- Why it was cut: The scenes were shot to humanize Luke Skywalker much earlier than in the final cut. It was removed along with subsequent scenes of Luke and his friends in Anchorhead, as it slowed the pace down. George Lucas had originally written the scenes and shot them at the suggestion of his industry friends who thought that audiences wouldn't understand the story being told from a droid's point of view. After Lucas's first screening of the rough cut of Star Wars in 1977, a fellow filmmaker jokingly accused him of producing "American Graffiti in space." Upon realizing that the story was being told through the droids' perspective and it was them leading things to Luke, Lucas took the footage out.[source?]
- Other appearances:
- Star Wars "Lost Cut"
- Star Wars: From the Adventures of Luke Skywalker 1977 novelization
- The Marvel Comics adaptation
- The Star Wars Storybook
- Pre-release publicity photographs
- Bubblegum cards (Luke in the Desert only)
- Behind The Magic CD ROM (1998) - silent, monochrome video, degraded quality
- Star Wars radio adaptation (1981)
- Luke and Biggs — This scene is a conversation between Luke and his oldest friend, Biggs Darklighter. Biggs has left Tatooine and is on planet leave from the Imperial Academy, where he is training to be a space pilot. Luke's envy of Biggs's success conflicts with his duty to his uncle and his reasons for remaining on Tatooine. Biggs quietly tells Luke that he has decided to join the Rebellion against the Empire. In an emotional exchange, the two young men say their farewells. (This scene was to come between the scene where C-3PO spots a distant Jawa sandcrawler in the desert and the capture of R2-D2 by Jawas in the canyon.)
- Why it was cut: The Luke and Biggs sequence was part of the Anchorhead backstory on Tatooine and was cut along with the other early scenes on Tatooine for the same reasons.
- Other appearances:
- Star Wars "Lost Cut"
- Star Wars: From the Adventures of Luke Skywalker 1977 novelization
- The Marvel Comics adaptation
- The Star Wars Storybook
- pre-release publicity photographs
- shown in 1998 at San Diego Comic Con
- Behind The Magic CD ROM (1998) - video, degraded quality
- Star Wars radio adaptation (1981)
- The Search for Artoo — R2-D2 has absconded from his new master, Luke Skywalker. Early in the morning, Luke and Threepio rush off in the landspeeder to search for Artoo, with Threepio driving the landspeeder. They talk about Artoo, Ben Kenobi and how angry Uncle Owen is going to be. (The scene belongs at the start of the sequence where Luke and Threepio search for Artoo, before the attack of the Tusken Raiders. The moment was scored with a light version of Luke's theme; the music can be heard at the beginning of the cue "Land of the Sand People" on the original LP and CD configurations, or "Landspeeder Search" in the Special Edition album.)
- Why it was cut: The landspeeder cockpit sequence had to be filmed against a rear-projection screen and was dropped due to poor quality.[source?]
- Other appearances:
- Star Wars "Lost Cut"
- Star Wars radio adaptation (1981)
Incomplete scenes released on Blu-ray
- Old Woman on Tatooine — As Luke's landspeeder races into the town of Anchorhead, he nearly runs over an old woman (an unfinished effects shot).[1]
- Aunt Beru's Blue Milk — A shot of Beru dispensing the blue milk before she joins Owen and Luke at dinner.[1]
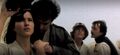
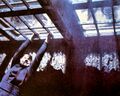
- Cantina Rough-Cut — Rough-cut footage of the Elstree Studios location cantina scene taken from the Lost Cut. The footage features some creatures that didn't make the final cut, Jenny sits next to Han and makes out with him, multiple alternate takes and cut lines, the full Paul Blake Greedo confrontation, etc.[1]
- Darth Vader Widens the Search — In this short scene, Darth Vader and Chief Bast walk along a corridor on the Death Star. Bast reports that the search for the missing droids has extended to Mos Eisley spaceport. Vader observes that Princess Leia is resisting interrogation and Bast boldly criticizes Tarkin's plan to break her as "foolish." (The scene would have appeared between the scene where Han Solo encounters Jabba the Hutt and the scene where Luke and Obi-Wan find the Millennium Falcon in Docking Bay 94.)[1]
- Why it was cut: Probably for reasons of time. The scene adds little to the plot. The unfinished scene features David Prowse's voice as Darth Vader from inside the costume.
- Other appearances:
- Star Wars "Lost Cut"
- Star Wars: From the Adventures of Luke Skywalker 1977 novelization
- The Marvel Comics adaptation
- pre-release publicity photographs
- stills used on bubblegum cards
- The Star Wars Holiday Special (footage redubbed)
- Stormtrooper Search — Stormtroopers search the alleys of Mos Eisley for the missing droids.
- Other appearances: The Star Wars Holiday Special (footage redubbed)
- Alternate Biggs and Luke Reunion — The scene between Biggs and Luke in the Rebel hangar bay lasts longer, involving Garven Dreis speaking of knowing Luke's father when he was just a boy.
Other cut scenes
- The first edit of the film was by John Jympson and referred to as the "Lost Cut." It contained all the footage that George Lucas had shot up to that point, as well as on-set sound effects and a different opening. This rough cut contained a lot of alternate takes that were not used in the final version of the film, plus several scenes that were subsequently cut. George Lucas decided to reedit the whole film to give it a faster pace. Aside from the small amount of still photos that have surfaced and monochrome footage of the cantina, Luke and Biggs on the Behind the Magic CD-ROM, very few people have seen it. The Star Wars Holiday Special borrowed footage for the "Life on Tatooine" segment. The cut has since deteriorated to black and white, but an article about it was published in Star Wars Insider 41.
- There are many short alternate takes throughout Star Wars where Luke appears in his poncho which can be seen in stills and bubblegum cards: Luke in the desert, in the Tusken Raiders' canyon, finding the destroyed homestead and in the hangar on Yavin 4. The only poncho scenes that made the final cut were in Docking Bay 94, on the Millennium Falcon flight from the Death Star and the arrival on Yavin 4.
- Vader oversees captured Rebel soldiers aboard the Tantive IV.[2]
- Alternate dialogue between Vader and Captain Antilles.[3]
- Alternate establishing shot of Kenobi's hut and landspeeder parked outside.[source?]
- Luke decides not to replace C-3PO's restraining bolt in Kenobi's hut.[source?]
- Extended dialogue between Luke and Ben inside Kenobi's hut.[2]
- Luke and Ben spend the night at Bestine.[source?]
- Extended conference room scene, with Cassio Tagge expressing his distrust for Darth Vader, referring to him as a "Sith Lord". This scene was later shown at Celebration 2017.[4]
- Obi-Wan proclaiming "Well, there we are" before describing Mos Eisley to Luke.[3]
- One long shot of the landspeeder traveling from the trooper checkpoint to the cantina.[source?]
- Ponda Baba was originally supposed to be decapitated instead of losing his arm. Footage of his head bobbing around on the floor was shown at the Cantina Archaeology panel at Star Wars Celebration 2019. This was most likely cut due to a decapitation being more violent than a dismemberment.[5]
- A patron of the cantina (Garouf Lafoe) leaves and reports the altercation between Obi Wan, Luke, Ponda Baba, and Dr Evazan to the stormtroopers. The camera follows him out of the cantina. In the final version in the film, he can briefly be seen just before an optical wipe and then immediately outside talking to the stormtroopers as C-3PO says, "I don't like the look of this." This footage can be found on the "Cantina Rough-Cut" scene featured on the Blu-Ray.[1]
- Luke is seen haggling over the price he gets for his land-speeder with Wioslea for a little longer than is shown in the film.[2]
- Extra shots of stormtroopers searching Mos Eisley.[2]
- A shot of a hidden gun on the Millennium Falcon shooting at stormtroopers was cut. This shot was later used in The Empire Strikes Back in the scene where Han, Leia, Chewbacca, and C-3PO reach the Millennium Falcon on Hoth.[2]
- Extended Alderaan destruction, including additional dialogue and extra shots of the Death Star Overbridge after Alderaan's destruction, featuring Leia being led away by Darth Vader.[2]
- Additional dialogue aboard the Millennium Falcon as it approaches the Death Star. Mark Hamill disliked the lines so much that he begged George Lucas to remove them, which he eventually did.[6]
- Extra dialogue during Han and Luke's argument on whether to rescue Princess Leia or not.[3]
- Extra shots of stormtroopers heading to their stations.[2]
- A rumored scene within the Death Star where Luke, Han, and Leia are fighting against stormtroopers. They are trapped against a locked blast door as R2-D2 attempts to open it. The center of the room is a circular pit from which stormtroopers are seen falling in as they are shot trying to cross with the use of grappling hooks.
- The scene in question has never surfaced online or in any other media, although rumors have stated it can be found on Roger Ebert's "Microsoft Cinemania," a DOS-based multimedia CD-ROM movie encyclopedia, released in the early 1990s. This however has yet to have been proven as all known copies of "Microsoft Cinemania" do not include the scene and evidence of the scene ever being filmed has never surfaced.
- More footage of Kenobi sneaking around the Death Star in search of the tractor beam.
- Obi-Wan's line "You can't win Darth. If you strike me down, I will become more powerful than you can possibly imagine." during his duel with Darth Vader was originally longer with the full line being "You can't win Darth. If my blade should find its mark, you will cease to exist. But I warn you, if you strike me down I shall become more powerful than you can possibly imagine."[3]
- A brief gag aboard the Death Star where after several Stormtroopers run through a corridor, a GNK power droid finds itself alone and scurries off.[3]
- A scene in which Han, Luke, Chewbacca and Leia swiftly make their way past several Imperials without their disguises before reaching the window overlooking the Millennium Falcon. The last few seconds of this scene remain in the film before Leia mentions "You came in that thing? You're braver than I thought". This can be found on J.W. Rinzler's The Making of Star Wars Enhanced Edition ebook.[3]
- Luke and Han congratulate each other after the TIE attack on the Millennium Falcon.[2]
- Several cut lines of Red Leader, Garven Dreis, and Gold Leader, Jon "Dutch" Vander, that were later used in Rogue One: A Star Wars Story.[7]
- Shots of TIE Fighter pilots running to their ships.[2]
- There was additional footage and dialogue of the Rebel pilot John D. He would have been shown having one TIE fighter kill before eventually being shot down. His death still exists on film, with the single line "I'm hit!"[8]
- Dialogue of Luke instructing the Millennium Falcon to flee from the Death Star after firing the proton torpedoes.[9]
-
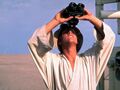 Luke watching the space battle
 -
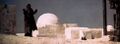 Old woman shouting after Luke
 -
 Biggs and Luke talking
 -
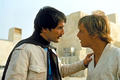 Luke says farewell to Biggs
 -
 Luke next to a moisture vaporator
 -
 Piloting the speeder
 -
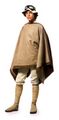 Luke wearing his poncho
 -
 A creature at Mos Eisley
 -
 Watching the skies of Tatooine
 -
 Han in the cantina with Jenny


Episode V -The Empire Strikes Back
Completed scenes released on Blu-ray
- Han and Leia: Extended Echo Base Argument — Han and Leia continue their argument beyond "You could use a good kiss!"[1]
- Deleted Wampa Scenes (These scenes were removed due to the poor-looking wampa costume effects.)[1]
- Alternate version of Han and Leia's argument in the hallway where a wampa hand is shown breaking through the ice in the wall.
- While fleeing Imperial troops, Han suggests they take a shortcut through a room that has a sign on it. Leia tells him "that's where they keep those creatures" (the wampas). They run off and C-3PO tears away the warning sign, hoping the troops will mistake it for another room. Sure enough, they do, and one of the snowtroopers is pulled in by a wampa. The other troopers quickly shut the door and stare in disbelief as Darth Vader walks up to them, seemingly just as confused or silently reprimanding them for stopping. (The part in which C-3PO tears off the warning sign appears in the original trailer.)
- Several Rebel troopers attempt to fend off several wampas that have escaped their containment unit during the battle of Hoth
- R2-D2 wanders down a corridor and narrowly escapes a wampa
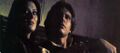
- Luke and Leia: Medical Center — After leaving the bacta tank, Luke and Leia almost kiss but are interrupted by C-3PO. Luke tells Leia that he has to go to the Dagobah system. Leia gets angry, explaining that Han was about to leave to pay off unpaid debts for Jabba the Hutt. Leia then says that she would get more loyalty if she went down the hall and recruited some of the wampas.[1]
Incomplete scenes released on Blu-ray
- Luke's Recovery — Luke in the bacta tank, with director Irvin Kershner providing the voice for 2-1B.[1]
- The Fate of General Veers — A snowspeeder crashes into an AT-AT Walker commanded by General Veers. (The character later appears in Expanded Universe stories, though the accident which could have resulted in his death is discussed as though the scene had taken place.)[1][10]
- Yoda's Test — Yoda trains Luke, who uses his lightsaber to cut up 4 metal bars that Yoda would have been levitating (no audio). This scene was included in the original novelization however.[1]
- Hiding in the Asteroid — Han works on the Falcon while the asteroid belt is bombarded by the Empire.[1]
- Alternate Han and Leia Kiss — A version of the kiss on the Falcon in which Leia returns the kiss.[1]
- Lobot's Capture — Lobot is captured by stormtroopers to be killed.[1]
- Leia Tends to Luke — Leia tells Luke about Han's capture by Boba Fett.[1]
Other cut scenes
- The wampa is shown in full form dragging Luke back to its lair (the scene proved difficult to film, due to the costume's effect on actor Des Webb).[11]
- 2-1B evaluates a dead tauntaun (seen in background of the final film when Han asks where Luke has gone).
- Luke wears a Bacta mask to heal his facial scars.[2]
- The Probe Droid shoots down a "snow squirrel" once it emerges from it's landing pod (an unfinished effects shot). This was changed to a Wampa in the original Empire Strikes Back novelization.[12]
- Several extra snowtrooper scenes, including a shot of one manning an E-Web heavy repeating blaster.[13]
- Additional shot of Vader looming over Lorth Needa's body.[13]
- Extra dialogue and an alternate scene between Han and Leia on Bespin in which they kiss. ("You should wear girls' clothes all the time.")[2]
- Originally scripted scenes of Lobot were changed after it was decided the character would not speak.[14]
-
-
 R2-D2 escapes a wampa.
 -
 Luke Skywalker returns to Echo Base amidst the wreckage of battle.
 -
-
 The pursuing snowtroopers enter the wampa pen.


Episode VI - Return of the Jedi
Completed scenes released on Blu-ray
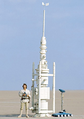
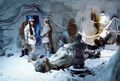
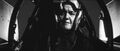
- Vader's Arrival and Reaching Out to Luke — After Darth Vader tells Moff Jerjerrod that the Emperor is coming, Vader goes back to his private chamber and begins to reach out to Luke. Later on Tatooine, as Vader is reaching to him through the force, Luke finishes building his brand new Lightsaber and ignites it for the first time. He then inserts it in a secret compartment in R2-D2's dome. R2 heads out of the cave, then he and C-3PO go to Jabba's Palace.[1]
- Rebel Raid on the Bunker — An additional battle in the shield bunker, where Han and Rebel soldiers encounter a squad of stormtroopers outside the control room. Han reacts to being called "Rebel scum." (This scene was later used as gameplay in the "Triumph of the Rebellion" mission in Star Wars: Rogue Squadron III: Rebel Strike.)[1]
Incomplete scenes released on Blu-ray
- Tatooine Sandstorm — Right after Jabba's Sail Barge blows up, Luke, Han, Leia, Lando, Chewbacca, and the droids go back to the Millennium Falcon and Luke's X-wing (both of which are in the middle of a sandstorm). Han thanks Luke for saving him and Luke explains to his friends that he has to go back to Dagobah. (No dialogue is clearly audible.)[1]
- Jerjerrod's Conflict:[1]
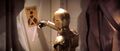
- Darth Vader Force chokes Moff Jerjerrod to get into the Emperor's throne room. (Vader's lines are spoken by Prowse inside the costume.) A second shot of this scene from an alternate angle exists.[13]
- Palpatine orders for Jerjerrod to fire the Death Star's superlaser at Endor in the event that the rebels manage to capture or otherwise deactivate the shield generator. Afterwards, upon learning of the shield's deactivation, Jerjerrod reluctantly carries out his command and gives orders to scramble fighters and open power discharge gates to flood certain sectors of the superstructure in order to prevent Red and Gold Squadrons from accessing the reactor core. These scenes were cut due to timing constraints.
- Battle of Endor: The Lost Rebels:[1]
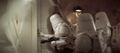
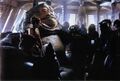
- B-roll footage of Rebel pilots being fed lines, with three never appearing in the film. These include a Human female pilot, a Sullustan, and a Mon Calamari pilot. The Mon Calamari eventually received an action figure, and was later made canon as Ika Sulko. Another female pilot made it into the film, but was dubbed over with a male's voice. That pilot was nonetheless later revealed to be a female named Sila Kott.
- General Crix Madine sitting in the Admiral's chair aboard Home One during the final battle. These scenes were filmed in case the Admiral Ackbar puppet effects did not work properly. Actor Dermot Crowley claims to have spent a few extra days filming in a moving chair shouting things such as "Fire!"
- There are cut shots of Rebel gunners aboard the Millennium Falcon including Airen Cracken and Blount.
- Extra shots of Lando Calrissian, Wedge Antilles, and several other Rebel pilots, including some of the cut ones, talking during the battle, notably when the Death Star begins to turn to face Endor and while they are flying through the superstructure during their assault on the reactor.
Other cut scenes
- A slightly extended version of Darth Vader's arrival in the second Death Star's hangar to speak with Jerjerrod shows more of Vader actually walking down the ramp. This shot was later utilized in the Special Edition of The Empire Strikes Back.[15]
- An alternate shot of Greeata Jendowanian and Rystál Sant reacting in horror to Oola's execution.[13]
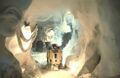
- Luke uses a force jump to escape the rancor and hangs from the ceiling grate until two Jawas bang their rifles on his hands forcing him to let go.[16] The scene appears in the Return of the Jedi novelization and in the Return of the Jedi Storybook, and a promotional photo of the scene appeared on a Topps trading card.[17]
- Peter Diamond wearing some kind of lightbulb suit in Jabba's Palace, as part of the design of an alien supposed to be added later in post-production.[18]
- Drunk guests having a party aboard the sail barge.[2]
- Barge fight between Ree-Yees and Saelt-Marae with C-3PO translating.[2]
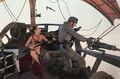
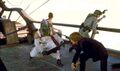
- Leia gets a vibro staff and attacks a human sail barge gunner, before she goes up to the cannon and positions it to the deck. A fraction of that footage can be seen in the final film where Leia moves to pick up the staff before Luke tells her to point the cannon at the deck. A far off view of that full scene being filmed can be found in some behind the scenes footage.[19] A glimpse of the scene can be found as a promotional photo[20], which was adapted for one panel of the Marvel Comics adaptation of the film.[21] The scene was also adapted in the second issue of the Star Wars Manga: Return of the Jedi comic series.[22]
- Ben's monologue.
- Vader and several other Imperials walk down a hallway to the hangar where the Emperor will be arriving on the Death Star.[2] Frames of this scene can be found on T-bone's Star Wars Universe website, and a promotional photo featuring the scene appears on a Topps trading card.[23]
- Extra scenes of the Emperor walking through the Death Star with Vader, Jerjerrod, and his advisors.[13]
- The Return of the Jedi Edit Droid Laserdisc featured a silent 59 seconds of R2-D2 repairing Luke's X-Wing on Dagobah and about 29 minutes of Frank Oz being fed lines as Yoda.[24] Among the scenes included the filming of a scene that revealed that Yoda had forbade Obi-Wan from telling Luke about Vader being Luke's father.
- Extended Rebel briefing and departure for Endor.[2]
- It was rumored that the B-Wing fighters would be given more to do during the battle in the Special Edition[source?], however this proved to be untrue. A promotional photo of B-Wings flying away from an exploding Star Destroyer during the Battle of Endor does however exist.[13]
- Extra shots of the Rebel strike team taking defensive positions outside of the Endor shield generator bunker.[13]
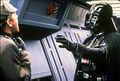
- Darth Vader lands in the Death Star docking bay with Luke, taking him to the Emperor.[25]
- Luke refusing to fight Vader and throwing him his lightsaber. Vader can be seen holding it along with his own in the final film as he searches for Luke in the throne room.[26]
- Extended Rebel and Ewok celebration.[2]
-
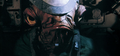
 Luke constructing his lightsaber in a cave
 -
 Luke hangs above the rancor pit
 -
 Leia sitting beside Jabba on the sail barge
 -
 Set photo of Leia attacking sail barge gunner
 -
 Just after Leia's attack on the gunner
 -
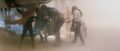 Sandstorm on Tatooine
 -
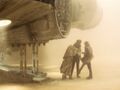 Parting ways in the storm
 -
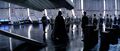 Moff Jerjerrod greets Vader
 -
 Vader chokes Jerjerrod
 -
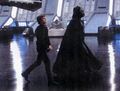 Luke and Vader arrive at Death Star II
 -
-
 The Sullustan pilot
 -
 The Human female pilot


Notes and references
- ↑ 1.00 1.01 1.02 1.03 1.04 1.05 1.06 1.07 1.08 1.09 1.10 1.11 1.12 1.13 1.14 1.15 1.16 1.17 1.18 1.19 1.20 Cite error: Invalid
<ref>tag; no text was provided for refs namedComplete Saga - ↑ 2.00 2.01 2.02 2.03 2.04 2.05 2.06 2.07 2.08 2.09 2.10 2.11 2.12 2.13 2.14 2.15
 The Unreleased Deleted Scenes of Star Wars on the Noah Lawson YouTube channel (backup link)
- ↑ 3.0 3.1 3.2 3.3 3.4 3.5 The Making of Star Wars: The Definitive Story Behind the Original Film (Enhanced Edition)
- ↑ Rare New Hope Deleted Death Star Meeting Extended- Star Wars Celebration 2017 RARE on the Star Wars Experience Network YouTube channel (backup link)
- ↑
 Much to Learn You Still Have: 9 Things You Might Not Know about the Aliens of Star Wars :A New Hope on StarWars.com (backup link)
- ↑ The Line Mark Hamill Begged George Lucas To Cut From Star Wars on the Looper YouTube channel (backup link)
- ↑ Rogue One: A Star Wars Story
- ↑
 "Rebel Pilot Reunion" – Star Wars Insider 32
- ↑ Star Wars: A New Hope Bloopers on the Seracco YouTube channel (backup link)
- ↑ The Making of The Empire Strikes Back Enhanced ebook edition, clip here: The Making of Star Wars: The Empire Strikes Back (Enhanced Edition) Ebook video clip (CH09-VIDEO_01) on the Tad Crutcher YouTube channel (backup link)
- ↑ The Making of "The Empire Strikes Back"
- ↑ The Making of The Empire Strikes Back Enhanced ebook edition, clip here: The Making of Star Wars: The Empire Strikes Back (Enhanced Edition) Ebook video clip (CH09-VIDEO_05) on the Tad Crutcher YouTube channel (backup link)
- ↑ 13.0 13.1 13.2 13.3 13.4 13.5 13.6 Cite error: Invalid
<ref>tag; no text was provided for refs namedCharacter Encyclopedia - ↑ "In the Star Wars Universe: Lobot Speaks!" – Star Wars Insider 33
- ↑ Star Wars: Episode V The Empire Strikes Back
- ↑ The Making of Return of the Jedi Enhanced ebook edition, clip here: The Making of Star Wars: Return of the Jedi (Enhanced Edition) Ebook video clip (CH09-VIDEO_02) on the Tad Crutcher YouTube channel (backup link)
- ↑
 1983 Topps Star Wars: Return of the Jedi Series 1 (Card: The Rancor Pit) (backup link)
- ↑ I Am C-3PO: The Inside Story
- ↑ STAR WARS - CARRIE FISHER AS SLAVE LEIA - RARE FOOTAGE on the STEPVA YouTube channel (backup link)
- ↑ 1983 Topps Star Wars: Return of the Jedi Series 1 (Card: Princess Leia Swings Into Action!) (backup link)
- ↑ Return of the Jedi 2
- ↑ Star Wars Manga: Return of the Jedi 2
- ↑ 1983 Topps Star Wars: Return of the Jedi Series 2 (Card: Corridors of the Imperial Destroyer) (backup link)
- ↑ Kushins, Jordan: Long Lost LaserDisc Found, Features Behind-The-Scenes Star Wars Footage (2013-10-23). Gizmodo (archived from the original on November 11, 2020)
- ↑ The Making of Return of the Jedi
- ↑ Star Wars: Episode VI Return of the Jedi